This entry contains detailed steps on how to configure a QNAP NAS device to forward log messages via the network over an SSL-encrypted tunnel. All information here should be accurate, but I can’t guarantee there are no errors. I therefore wrap this entire entry in an “it works for me and I hope it also works for you” clause! If you find that there are any problems, please let me know in the comments.
 I use a QNAP NAS at home as a Time Machine Target, VPN server, as well as traditional file serving features. It’s been a solid platform with a lot of features. However, one feature it was lacking was the ability to send syslog-based log messages over a TCP connection rather than the more common legacy UDP transport method. UDP does not provide what is considered a “reliable” transport mechanism. Further, the syslog protocol does not include any provisions to encrypt the contents of each packet, so the potentially sensitive details of each log message are passed in the clear – not an ideal situation.
So why send log messages over the network in the first place? In two words: Log aggregation. When logs are maintained on each server, workstation, or other network-connected device, an administrator must move around to each platform to review the logs when something is wrong. With more endpoint devices than ever, this is clearly not efficient. Plus, when analyzing a problem, it’s helpful to review log messages from the wider environment. Events from different endpoints can provide a more comprehensive picture of what was occurring at a particular time.
When handling a security incident such as a network intrusion, the need to aggregate logs in a central location is even more critical. In a bid to hide their tracks, attackers often erase logs on the devices they compromise. Without logs, identifying the mere presence – let alone the tactics – of an attacker is complicated significantly.
Now that you can see why log aggregation is important, let’s look back to the QNAP NAS. This line of devices is suitable for a home network to a medium-sized business environment. The platforms use between two and eight drives, and provide a variety of different network services. The logging data each device provides could be invaluable to an administrator troubleshooting problems, or an investigator determining the actions of an intruder.
The following diagram depicts the architecture that I used to send syslog messages offsite to a log aggregator over TCP, using SSL encryption for all data.

Step 1 Stunnel
This step assumes that you have an stunnel-based TCP syslog aggregator already in operation. I may publish another article describing this process in the future, but it’s left as an exercise to the reader for now.
For this article, the log aggregation server’s DNS name will be “syslog.example.com“, listening on TCP port 10514
- SSH to your QNAP NAS
- Edit /etc/stunnel/stunnel.conf. Add the following to any existing lines:
[srsyslogd]
client = yes
CAfile = /etc/config/stunnel/cacert.pem
verify = 2
accept = 127.0.0.1:11514
connect = syslog.example.com:10514
- If you have your own CA certificate, put it in /etc/config/stunnel/cacert.pem. If not, omit this line from /etc/stunnel/stunnel.conf
- Save the file and reload stunnel with the following commands:
[~] # /etc/init.d/stunnel.sh restart
Shutting down stunnel services: stunnel.
Starting stunnel services: stunnel.
- In more recent versions of the QNAP firmware (v4.1.1 build 1003 at this time), persistence across reboots may require some additional tweaking. I found that old configurations no longer worked, and had to add “/usr/sbin/stunnel /etc/stunnel/stunnel.conf” via an autorun.sh file.
Step 2: Install Optware
- Log into your QNAP NAS’s web interface
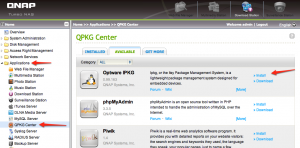
- Navigate to “Applications” then “QPKG Center”
- Install the “Optware” package, then enable it.


Step 3: Install and configure syslog-ng
- SSH to your QNAP NAS (If you are already logged in via SSH, log out and back in so the Optware commands are available in your shell.)
- Run the following commands:
[~] # ipkg update
[~] # ipkg install syslog-ng
- Edit /opt/etc/syslog-ng/syslog-ng.conf. Replace all contents with the following:
options { long_hostnames(off); keep_hostname(yes); sync(0); };
source localhostudp { udp( ip("127.0.0.1") port(8514) ); };
destination stunnel_loghost { tcp("127.0.0.1" port(11514)); };
log { source(localhostudp); destination(stunnel_loghost); };
- The syslog-ng daemon is very flexible, and you can definitely get very creative in which log messages you choose to relay. Elaborate configurations go beyond the scope of this article, so the four lines above are sufficient for our purposes. All we’re doing is “converting” UDP syslog messages to TCP syslog messages. Here is a brief rundown on the configuration directives:
- long_hostnames: syslog-ng can “chain” hostnames of relaying stations to each message. We’re disabling that because of hops that the overall system sees as “localhost”.
- keep_hostname: Similarly, the ultimate destination would receive a message from “localhost” versus from “MyHomeNAS”. Setting this option keeps the originating hostname on each message.
- sync: Setting to zero forces syslog-ng to push each message as it’s received, rather than queueing up a series of messages to send at once.
- source localhostudp...: The “localhostudp” is an arbitrary identifier for messages meeting the following specifications: sent via UDP port 8514 from localhost.
- destination stunnel_loghost...: Again, “stunnel_loghost” is an arbitrary identifier for somewhere we’ll be sending our messages – here, to the stunnel listener on localhost, TCP port 11514.
- log...: This line simply says that whenever a message is received from the “localhostudp” source, send it to the “stunnel_loghost” destination.
- Start the syslog-ng daemon:
[~] # /opt/etc/init.d/S01syslog-ng
- Patch the Optware startup script so it also starts Optware-installed services (including syslog-ng). Edit /etc/init.d/Optware.sh, and add the following around line 59 (just before “# determine the right feed based on cpu type“)
# Patch per http://wiki.qnap.com/wiki/Install_Optware_IPKG/bin/echo "Run Optware/ipkg /opt/etc/init.d/*"
source /etc/profile
# Start all init scripts in /opt/etc/init.d
# executing them in numerical order.
#
for i in /opt/etc/init.d/S??* ;do
# Ignore dangling symlinks (if any).
#[ ! -f "$i" ] && continue

case "$i" in
*.sh)
# Source shell script for speed.
(
trap - INT QUIT TSTP
set start
. $i
)
;;
*)
# No sh extension, so fork subprocess.
$i start
;;
esac
done
# End patch
Step 4: Direct the QNAP’s own log daemon to use the syslog tunnel chain
- Log into your QNAP NAS’s web interface
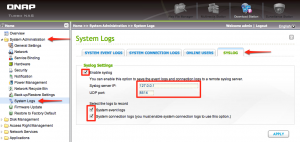
- Navigate to “System Administration” then “System Logs”
- Select the “SYSTEM CONNECTION LOGS” tab
- If the second button below the tabs shows “Start Logging”, click it. If it shows “Stop Logging”, you’re already logging system connections so leave it alone.
- Select the “SYSLOG” tab
- Check the “Enable syslog” box, with IP address set to “127.0.0.1” and UDP port set to “8514”.
- Check both boxes at the bottom, so system events and connection logs are sent via syslog
- Click the “Apply” button

Step 5: Verify!
- Log into your log aggregation server and start watching the appropriate syslog target file(s). In my case (CentOS Linux on the log aggregation server), this means watching the /var/log/messages and /var/log/secure files.
tail -f /var/log/messages /var/log/secure
- Log into your QNAP NAS with either SSH or the web interface.
- You should see log messages something line the following on your log server:
Aug 29 06:53:58 MyHomeNAS qlogd[5616]: conn log: Users: TimeMachine, Source IP: 192.168.4.19, Computer name: ---, Connection type: AFP, Accessed resources: ---, Action: Login OK Aug 29 06:54:01 MyHomeNAS qlogd[5616]: conn log: Users: admin, Source IP: 192.168.4.3, Computer name: ---, Connection type: HTTP, Accessed resources: ---, Action: Logout Aug 29 06:54:09 MyHomeNAS qlogd[5616]: conn log: Users: admin, Source IP: 192.168.4.3, Computer name: ---, Connection type: HTTP, Accessed resources: Administration, Action: Login OK Aug 29 06:55:32 MyHomeNAS qlogd[5616]: conn log: Users: admin, Source IP: 192.168.4.3, Computer name: ---, Connection type: HTTP, Accessed resources: ---, Action: Logout
- This means that you’re in business!
- It’s imperative to ensure configuration such as these will “stick” across a reboot. For this reason, I strongly recommend doing a complete graceful shutdown and reboot on the NAS, then re-verifying that everything is operating as intended.
Troubleshooting notes
- The steps above, if followed in detail, should work across most configurations of QNAP devices and log servers. However, I found the following utilities helpful in troubleshooting the various tunnels and services while writing this article:
- tcpdump: (“ipkg install tcpdump” via SSH) This helped me confirm that traffic was flowing across the various segments of the tunnel as intended. I also ran into a few snags with duplicate syslog messages at the aggregation server, and used tcpdump to figure out where that was being triggered.
- Wireshark: (Runs on a separate system, reads the pcap files created by tcpdump) Used in conjunction with tcpdump to determine what was occurring at each stage of the network transfer.
